spoon

Butternut Squash, Farro, and Kale Salad

0

Category: , , ,


As the days shorten, mornings become crisper, and we break out longer sleeves, this salad is a great transition dish.  It's packed with fall produce and flavors, but is served cold or at room temperature, bridging the gap between the light, less cooked meals of summer and the hearty greens and squashes of fall. 

The salad needs to be made ahead in order for the kale to soften just a bit and for the flavors to blend together.  It also makes a lot, so this salad will last a good 4 meals, if not more.

Butternut Squash, Farro, and Kale Salad
serves 4-6

1 medium butternut squash
1/2 bunch kale
1/2 cup farro
1/2 onion, finely diced
1/4 cup feta cheese
1/2 cup roasted pumpkin seeds
1/4 cup olive oil
1 Tb white wine vinegar
Salt and pepper

Roast your squash:  preheat oven to 375.  Line a baking sheet with aluminum foil.  Peel and halve your butternut squash lengthwise and scoop out seeds.  Cut into bite size (about 3/4") cubes and place on baking sheet.  Drizzle with olive oil and sprinkle with salt and pepper, and toss to distribute the oil and seasonings.  Bake in your oven for 30-40 minutes, tossing them about halfway through.  Remove from oven and let cool.  This step can be done a day or two ahead of time.  If you do that, refrigerate the squash.

Prep your farro:  follow package directions to cook farro.  Let cool.  Also may be done ahead of time.

Pickle your onions: place your finely diced onion into the bottom of a large bowl and pour over the vinegar and 1 Tb water.  Allow it to sit while you prep the rest of the salad ingredients.  Prep the kale by tearing the leaves from the thick stem, washing the leaves, drying them using a salad spinner or towel, and then roughly chopping them.  

Assemble the salad:  into the bowl in which you have the onion, add the kale, butternut squash, feta, and pumpkin seeds.  Pour over about 2-3 Tb olive oil and stir everything to incorporate.  Allow to sit in fridge at least an hour before serving, and the longer it sits, the better it gets.  

Notes
  • I always like to give credit where it's due.  This recipe was inspired by a Smitten Kitchen recipe.
  • Farro is a grain, and it is sold in several places.  I found my bag at Trader Joe's.  If you can't find farro, you can substitute barley, quinoa, and even rice or some other grain.  


Salmon with Lemon and a Creamy Dill Sauce

0

Category: ,


This was our Sunday after church meal this week, but it could just as easily be a Tuesday night after work meal, too.  Fish is so quick to prepare that you can have a special meal on the table in about 20 minutes.  I found this one on Pinterest of all places, and I think we both really enjoyed it- the salmon flavor was allowed to come through, while being complemented by the olive oil/lemon mixture, and the creamy dill sauce played nicely with those flavors, too.


The whole dish can be made in about 20 minutes, including oven pre-heat time, and it has a short ingredient list, but packs quite a bit of flavor.  This will definitely be on my "make again" list. 


What are some of your favorite quick meal suggestions?

Baked Lemon Salmon With Creamy Dill Sauce
adapted from Cooking Classy blog

to serve 2-3 adults

1- 8-10 oz portion of salmon
1 Tbsp extra virgin olive oil
1 1/2 tsp lemon zest
2 Tbsp fresh lemon juice
Salt and freshly ground black pepper

Creamy Dill Sauce
1/3 cup plain Greek Yogurt
3 Tbsp mayonnaise
1 clove garlic, finely minced
1 tsp. dried dill
2 - 3 tsp milk
Salt and freshly ground black pepper

Preheat oven to 400 degrees. In a bowl, whisk together olive oil, lemon zest and lemon juice. Grease a 8X8-inch baking dish and place salmon fillet in baking dish. Season tops of salmon with salt and pepper then rotate to opposite side. Drizzle tops evenly with lemon mixture and gently rub over salmon.  Let rest at room temperature 10 minutes, then bake in preheated oven 10 minutes, or until salmon has cooked through (cook time will vary based on thickness of fillets and how well done you liked them). Serve warm topped with Creamy Dill Sauce, which you can make while salmon bakes.
For the sauce:
In a bowl, mix together Greek yogurt, mayonnaise, garlic, dill, honey, and enough milk to reach desired consistency. Season with salt and pepper to taste. If you make this ahead of time, store in refrigerator, allow to rest at room temperature 20 minutes before serving (just so it's not ice cold over warm salmon).

One Year Ago:  Honey Apple Cake
Two Years Ago:  Slow Cooker Chicken Cacciatore over Polenta
Three Years Ago:  Swiss Chard Ravioli
Four Years Ago:  Hamburger Buns


Mocha Trifle

0

Category: , ,


Does this qualify as a Meatless Monday offering?  Regardless, this little treat is a good dessert when you want something make-ahead and you need to feed a crowd.  I would estimate that you could easily feed 15 people with this.  

While not a traditional trifle, the family dessert is no place for semantics.  Chocolate cake is cut into cubes and soaked with coffee.  That is then topped by coffee-laced white chocolate pudding and whipped cream, and all is topped off with chocolate shavings and chopped up chocolate covered espresso beans.  Don't leave those out, for they are what send this dessert over the mocha edge.  I will post the dessert as I made it, but will also post alternative ingredients to the side and explain in the notes section.


Mocha Trifle
serves 15

1 chocolate cake, baked in a 9x13 pan
1 large tub cool whip or approx. 2 cups heavy cream, whipped (you want about 6 cups total whipped cream)
1/2 cup strong brewed coffee or espresso
3-4 packages white chocolate instant pudding mix
4 cups almond milk OR 6 cups cow's milk
Dark chocolate bar (optional)
3 Tb. Chocolate covered espresso beans, chopped

Bake a chocolate cake according to recipe or package directions.  When cooled, cut into about 1 inch cubes.

Make your instant pudding (if you're a purist, feel free to make your own pudding; you want about 5-6 cups):
            Dissolve either instant coffee or instant espresso in your milk before adding it to your pudding mixture.  The amount depends on your own desire for the coffee flavor to shine through, but I'd go with about 1/3 cup intsant coffee or 3 Tb. instant espresso.  If you, like me, need a dairy free option, you need 4 boxes of pudding mix.  Mix 1 box mix to 1 cup almond milk, dissolving the instant espresso/coffee into your milk prior to mixing with the pudding.  If you don't need a dairy free option, you could get away with 2-3 boxes pudding mix, and follow package directions with amount of milk, adding the instant coffee/espresso prior to mixing with pudding mix.  Set aside.

In a large bowl or trifle bowl, layer as follows:
Place a layer of cake cubes in the bottom of the bowl.  If you have a plastic squeeze bottle, pour half your brewed coffee/espresso into the bottle and squirt over the cake.  Top with half the pudding mixture, and the top that with the whipped topping/cream.  Repeat layers.  On top, for garnish, scatter chopped, chocolate covered espresso beans and, if desired, use a small hole zester/grater (such as a Microplane) to grate little chocolate shavings on top.  Cover and refrigerate about a day or two before you need to serve.

Notes

  • My dad can't have dairy, which sometimes presents a challenge in making desserts.  I mean, take away milk, cream, butter, sour cream, and cream cheese, and you're left with a baking challenge.  While not the food snobby thing to do, I used a cake mix, pudding mixes with almond milk, and whipped topping.  If you're a purist, feel free to make all these homemade.  There are also low sugar and sugar free options in most of these products, which make it helpful for those with diabetes.  
  • This tasted pretty good the day I served it (1 day after I made it), but it tasted way better and the mocha flavor really came through the next day, so you could make this as far as 2-3 days in advance and still have a killer dessert.  Garnish before you serve rather than when you make it.
  • Feel free to try another pudding flavor, such as cheesecake, vanilla, or even chocolate.  I like the color contrast of the coffee-colored pudding.
  • We liked this pretty well as is, but I thought about adding a crunchy element/layer through the dessert.  If you want to play a little bit, add in some chocolate biscotti or more chocolate covered espresso beans between the pudding and whipped cream layers.
  • By the way, when pouring/squirting the coffee over the cake, you don't want to absolutely inundate the cake with coffee.  It shouldn't be so soggy it falls apart.  You just want to impart some coffee flavor into the cake.

Smoked Chicken Wings

0

Category: , , ,


Do you smoke?  If there's any kind of smoking I can get behind, it's smoking meat.  Drew is our resident grill master, and he's been experimenting with smoking chicken in our kettle grill, and has been pretty successful with his outcomes.  Most recently he smoked chicken wings as opposed to a whole chicken, and they are good. 

                    
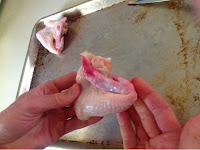
The the three part chicken wing fold
   
Smoking can either be done cold or hot.  This one falls into the hot category (I think).  The process is a bit detailed and it has several steps.  The recipe, from start to finish, will take around two hours.  The techniques, though, are simple, and I'd say even a pretty inexperienced person could do this if he or she pays attention to the steps. 


What makes the detail and time spent worth it is the huge payload of flavor.  Somehow the meat retains its moisture, and picks up a nice smokiness that complements rather than overpowers the flavor.


The technique that Drew employed is called the Snake Method, and it utilizes a combination of unlit coals, wood, and lit coals.  The pictures above demonstrate the setup steps.  The Snake Method allows the unlit coals to begin burning and continue the smoking process without having to disturb the meat as it smokes/cooks to replenish coals.  This method has so far given us consistent temperature and longevity of coals.

The first chicken wings go on- notice the drip pan below!

Alchemy- from this


To this.


He has now also done a whole chicken, turkey, and I think chicken leg quarters, all using this method, and it comes out nice.  The meat is great straight off the grill, on sandwiches, whatever.


Smoked Chicken Wings
feeds 2 people

2 lbs chicken wings
Salt and pepper

Place 4-5 chunks of wood (we used hickory) in a bowl and cover with water.  Keep submerged using a plate covered with water.  Soak approx. 30 minutes.

Prep your chicken by folding the wing tip under, making a triangle with the wings.  Pat dry with paper towels, and season well with salt and pepper.  Set aside until grill is ready.

Prep your grill:  in a kettle grill, lay down two rows of charcoal briquettes, about 1/3 of the way around the circumference.  Stack coals on top of these, about 3 briquettes high.  Put enough coals in a chimney starter to cover the bottom and light the chimney starter using newspaper.  Since there are so few, this only takes about 10-15 minutes.  When the coals are hot, dump the coals on one side of the charcoal snake, and lay the wood on top of the lit and the first part of the unlit coals, with even spacing of about 1-2 inches in between.

Place an aluminum drip pan (or a makeshift one from 3 layers of aluminum foil) in the middle of the grill and place the grate on top.  Oil your grate, and place your chicken directly over the drip pan.

Place the lid on the grill, and maintain grill temperature between 250 and 275.  Cook for about an hour or until the wings have an internal temp. of 165.  Remove from grill and allow to rest before eating, about 5-10 minutes.

Notes

  • The wings take the shortest of anything we've done so far.  The method stays the same, but the temperature and cook times may vary.  
  • These were really good with bbq sauce.

How to Toast Coconut

0

Category: ,


A month or so ago, I was able to catch some older episodes of the Food Network show Worst Cooks in America.  In a later episode, Anne Burrell said something that is really good to remember, that "brown food tastes good."

By the way, as I type this, my husband has a turkey in our bath tub, but more on that later.  That's me, always keeping you in suspense.

Back to Anne Burrell and brown food- as I thought about what she said, I realized how right she was.  We sear our meats, roast vegetables, brown butter, toast marshmallows, and pretty much, if it's brown from caramelization, it's tasty.

The same goes for coconut.  Fresh coconut is wonderful, but more often than not, I'm working with the white, thin ribbons of dried and sugared coconut.  While I've come to accept it, I can really get excited about toasted coconut.  When you toast the bagged coconut, it transforms from an overly sweetened, leathery textured, shell of its fresh former glory into a flavor powerhouse in its own right.  The sugars mellow, and the ribbons become crunchy and brittle.  A roasted flavor develops, making the coconut complex and something I eat by the handfuls.  You can substitute toasted coconut for fresh in almost any recipe.

Toasted Coconut

1-2 cups shredded or flaked coconut

Preheat your oven to 325 and place and oven rack in the center.  Spread your flaked/shredded coconut out on a baking sheet in an even layer.  Bake for about 5-10 minutes, until most of the coconut is lightly browned.  You may want to adjust time for your own oven or preferences.

Overnight Oats With Coconut and Mango

0

Category: ,


Overnight oats have somewhat recently come into their own as a food magazine's or food blogger's topic of choice.  This one is a no-cook way of reconstituting dried oats with almond milk, fruit and other add-ins that allow it to be ready and waiting for you when you wake up in the morning.  They are tasty and somewhat refreshing, and of course, nutritious!  They're also about 3 minutes of prep time, not counting time spent in the fridge.  What could be better for a quick weekday breakfast?


This particular recipe was inspired by a post I saw on Pinterest, that immediately jumped out at me for its use of coconut and mango, which mentally transported me to the tropics.  What better way to start your morning than with a mini-escape?

Overnight Oats With Coconut and Mango
adapted from Oh My Veggies blog

to make 1 serving

2/3 cup old fashioned rolled oats
2/3 cup almond milk (you may use whatever milky liquid you have on hand)
1/2 mango, diced
1/4 cup shredded toasted coconut (or regular, if you don't want to toast the coconut), reserving about 1 tsp. for the topping
2 Tb. sliced almonds

In a jar or mug that holds at least 16 oz, add all ingredients except for 1 tsp. coconut and the almonds, stirring to mix.  Cover with plastic wrap and place in refrigerator overnight.  In the morning, top with the remaining coconut and the almonds and enjoy!

Notes
  • I will do a post on how to toast coconut, but if you want to know now, just heat your oven to 325.  Put a single layer of coconut on a baking sheet and toast 5-10 minutes.  Store leftovers in a resealable container.
  • The oats are sweet enough for me as I wrote it, but if you prefer sweeter than that, add honey, molasses, agave- whatever suits you!  


Tip Thursday: How to Quickly Grate Parmesan Cheese

0

Category: ,


You might be thinking I'm a real dork for posting this idea, and that, like brushing your hair, this isn't something I need to post about.  I, however, am just discovering this little trick, and in the case that you're not the ultimate life hacker source for ideas and inspiration, I give you this little tip- grate your block Parmesan cheese in the food processor.  This also works with Parmesan's refined older sibling, Parmigiano Reggiano, or other hard cheeses, such as asiago and romano.  

Prior to this method, I had tried a knock off of the Bullet and hand grating with a Microplane to grate Parmesan cheese.  I still love the Microplane's thin ribbons for Parmesan cheese, but for bulk grating (such as for pesto, lasagna, etc), I plan to use this method.  Here is what I did:


Take your wedge of Parmesan cheese and cut off the rind, or if you're not going to use the whole wedge, cut off a good sized chunk- maybe 2-3 oz.  Other tip- save the rind, wrapped in plastic, and stick it in the freezer.  Take it out to use in soups or broths.  So, cut off the rind, and cut the cheese into cubes, around 1/2"- 1" thick.  Place the cheese into the bowl of the food processor fitted with the blade, and pulse about 15 times or hit start and let it go for about 5-10 seconds.  Remove the lid to the processor and check it for uniformity.  You're looking for little granules, like you'd find in the green topped shakers.  If there are still several big chunks, continue processing or pulsing until it's the desired size.  Store in a resealable container in the fridge.


Frozen Chocolate Covered Banana Slices

0

Category: ,


These kind of make me think of Arrested Development.  If you are unfamiliar with the show, the family has a frozen banana stand.  So, this is a snack that makes me snicker, but it is absolutely delightful.  These chocolate covered slices take a bit of work, but it's easy and completely worth it.  This may be my new favorite warm weather treat.  They're a good combination of healthy and decadent, and I wish I had some to munch on right now, because it's hot outside and, well, do you need a reason to want these?

Frozen Chocolate Covered Banana Slices
1 banana, cut into 1/2 inch slices
1 cup bittersweet or semisweet chocolate chips or 6 oz chocolate, broken/cut up
1 Tb coconut oil

In the microwave or in a double boiler, melt your chocolate and coconut oil (see notes).  Dip the banana slices into the melted chocolate and use 2 forks (my favorite method) to flip and coat the slices in chocolate while draining off the excess.  Place the chocolate coated banana slices on a wax or parchment paper lined baking sheet and place the whole thing in the freezer.  Freeze slices approx. 2 hours or until frozen through.  At this point they may be stored in a zip top bag or other resealable container, if they last that long.

Notes
  • If you melt your chocolate chips/coconut oil in the microwave, place the chocolate and oil into a microwave safe bowl and microwave on high for 30 second intervals, taking out to stir at the end of each interval.  Total melt time is around 2- 2.5 minutes.  
  • If you melt your chocolate chips on the stove top, you will want to use a double boiler.  To do this, place your chocolate and coconut oil in a small to medium glass or metal bowl.  Put about an inch of water in the bottom of a small-medium saucepan and place the bowl inside.  The bowl should not be so small that it touches the water or the bottom of the pot.  Heat on medium-high until the water starts to boil, and then cut the heat back so that the water is at a simmer.  Stir chocolate and oil as it melts and keep the water heated to maintain consistency.