spoon
Showing posts with label Main Dishes. Show all posts

Throwback Thursday: My Mom's Meatloaf

0

Category: ,


This is one of the recipes I remember my mom making a lot.  We didn't have it every week or anything, but we had it pretty often, and with good reason.  Everyone loves it, even those who don't usually like meatloaf.  For whatever reason there was a span of time I don't remember eating it at all- I'm sure it was partially because I was away at college or living on my own, but recently mom has broken the meatloaf out for some family dinners, and I am immediately transported to second grade, and that's a good thing.


Since rediscovering the meatloaf, I've made it for a family reunion and Drew has made it for the fire station.  This recipe is older than I am, and it's not going anywhere any time soon.

Meatloaf
from my mom's recipe collection

1.5 lbs. ground beef (85/15 is recommended, but any kind will do)
1 cup plain bread crumbs
1 medium onion, chopped
1/2 cup milk
4 Tb (1/4 cup) ketchup
1 egg
Salt and pepper

Mix above ingredients and lightly press into a 9x13 baking dish.  Pour over the sauce (recipe to follow) and bake, uncovered, at 350 for 1 hour.

Sauce
4 Tb (1/4 c) apple cider vinegar
2 Tb (1 oz) Worcestershire Sauce
4 Tb (1/4 c) brown sugar
1/2 cup ketchup

Combine sauce ingredients in a small sauce pan.  Heat until warm and pour over meatloaf.

Notes

  • my mom recommends 85% lean ground beef and I won't question it.  I'd say if you choose to go leaner, you may want to cover the meatloaf for the first 20-30 minutes.
  • You want to use ground beef that is in a square package, not the tube.  The tubes compress the meat too much.  


Barbecue Chicken Sliders

0

Category: ,


Every family, every cook has their simple favorites, the recipes that are go-to's for busy nights or times where you just aren't sure what to cook.  They are not fancy, and they're not what you would make for your audition for Master Chef, but they are what you make for your family on, say a Tuesday.  You often don't even need to pull out a cookbook or smart phone to make it- you know how it's done.  What are some of your recipes/dinner ideas like that?  Let me know in the comments :)

This is one of those recipes for me.  It's not even really a recipe, just a meal idea that I can pull together in about 10 minutes that is a consistent winner.  My family got the idea from an old Kraft Food and Family magazine years ago, and we've all been making it since.  These barbecue chicken sliders are a healthy, tasty favorite that is always a good answer to the question, "what's for dinner?"

Oh, and since you likely won't need a whole chicken, these are either perfect to use up leftover chicken or they're good to keep in mind that you'll be able to get two meals out of your chicken.

Barbecue Chicken Sliders
from Kraft Foods

To feed 4 people generously

1- 12 pack of Hawaiian sweet rolls (any roll will do, but these put it over the top)
1/2 cooked chicken, about 2-3 cups (rotisserie is perfect here), pulled from bone and shredded
1 cup bbq sauce of your choice
1/2 pkg. broccoli slaw mixture
1/2 cup ranch dresssing

In a medium bowl, combine the chicken and the bbq sauce.  Drew actually prefers the chicken to be plain and the sauce to be spooned over the top, so this step is optional.  In another small to med. bowl, combine the ranch dressing and slaw mixture.

Assemble the sandwiches by cutting the rolls in half and, if desired, scooping out some of the bread to make the chicken and slaw better fit.  On the bottom half of the roll, place the chicken and top with some of the slaw.  Top with the top half of the roll, and done.

Serve with chips, fries, or a salad (broccoli, pasta, potato).  

Eggroll Stir Fry

0

Category: ,


Thanks to going out of date sales, I've come into some ground beef lately.  I say that like some people talk about coming into money.

So, what to do with this ground beef?  Sure, I could make something familiar, but I wanted to try something different, something new.  This is why food blogging works for me- I like to try new recipes and the blog is a great way to document that and I hope that it ultimately can give you some feedback on the recipe.  I mean, how many times do you see a recipe and wonder if it's any good?  While I can't guarantee we have the same tastes, maybe I can at least help you decide if it'll be worth a try for you or not.


A Pinterest search led me to today's recipe, which I liked for its use of a lot of vegetables and how it is just Asian enough to be different from my normal foods but not so Asian I can't find the ingredients/Drew won't enjoy it.

I made it last week and am so glad I did.  I will definitely add this one to the "keeper" pile.  This really does taste like an eggroll without the wrapper (and without the frying!), and the beef is a nice flavor with the cabbage.  Actually, it's better than an eggroll.  It tastes...fresher.  The vegetables are soft but not mushy.  The ton of vegetables means you can eat more and not feel guilty about it, too!  


The one thing I will say about this dish is that we got 3 meal sized servings out of it instead of 4-6.  That could be our huge appetites, but it is something to note when making this.  

Neither of us like rice, and I think the point of this recipe is to be low carb, so we ate just the stir fry alone.  I'd say if you don't care about the carb addition, serve with rice or noodles.  I bet it'd be great with lo mein.


slightly altared from South Your Mouth

1 pound ground beef or other meat (see notes)
1 large onion, cut into slivers
1 small head of cabbage
4 carrots
4-5 cloves garlic, minced
1 tablespoon grated fresh ginger
1/2 teaspoon black pepper
2 tablespoons flax oil
1 tablespoon vegetable oil
1/4 cup soy sauce
Dash red pepper flakes (optional)

Cook and crumble ground meat with onions in a very large skillet until meat is cooked through. Do not drain. You’ll need to select a skillet large enough to contain all the cabbage – divide everything evenly into two skillets if necessary.

While meat and onions are cooking cut cabbage into thin shreds; set aside. Peel carrots with a vegetable peeler then either dice small or use the peeler to shave off thin slices; set aside.

Combine garlic, ginger, pepper, pepper flakes (if using), flax oil, vegetable oil and soy sauce in a small bowl and stir to combine; set aside.

Add cabbage and carrots to ground meat then cook and stir over medium-high heat for 3-4 minutes. Add soy sauce mixture then stir well.  Reduce heat to medium and continue cooking for 5-10 minutes or until cabbage is tender.

Recipe makes approximately 4-6 servings.

Notes
  • While ground beef isn't traditional in an egg roll, I really like it here.  We don't eat pork, so I have no advice on how to cook it.  If you use ground chicken or turkey, you'll likely want to add a TB of vegetable oil to the pan with the meat and onions.  I used 85/15 ground beef, so I didn't have to add oil, but if you use the 93/7, you may need to add some.
  • The cabbage starts out taking up a TON of space, but it wilts to next to nothing.  I used a 6 qt. saute pot and it held everything really well.  A skillet with high sides would be ideal.
  • Maybe it's toasted sesame oil, but I haven't liked the taste of sesame oil, which is originally called for in this recipe.  I used flax oil, since it's also what I had on hand.  

Zucchini Pizza Casserole

0

Category: , ,


Weird name, delicious dish.  I promise!

Zucchini season is mostly over here, but it can still be found at farmer's markets and maybe other parts of the country.  Thanks to my mother in law, we had a couple zucchini plants that gave us enough for a couple different dishes.  Thanks, Barbara!


I had this recipe pinned for a couple years when we had zucchini coming out our ears, and you can only make so much zucchini bread before you feel like you're going to need the Biggest Loser Ranch, am I right?  So anyway, I pinned this recipe a while back but hadn't made it yet.  I've made several other zucchini recipes, but I like to try new recipes (hence the blog).


I can remember pinning this one and not being too sure about it.  Zucchini pizza casserole?  Sounds weird.  I like zucchini on pizza, so maybe it will work, but what if it's one of those attempts to be healthy that ends up with a dish that doesn't taste very good?  Oh, well, it's rated pretty highly on Taste Of Home's website so I'll give it a go.

You've just had a peek inside my mind.  I hope that doesn't deter you!


Anyway, I tried it and we liked it!  This casserole has a zucchini and cheese crust topped by a sauce that is like meat sauce for spaghetti.  The one way I'd like to improve this dish is to make the sauce taste more like pizza sauce than spaghetti sauce.  The next time I make this dish I may try to not cook the tomatoes before baking the casserole.  That crust, though.  It is delicious!  If you like the taste of cheese when it gets a little cooked and browned, you want to eat the entire crust without sharing.

So I recommend this recipe.  It's easy and tasty, and is probably a good one to take to a potluck or a friend who may need a meal.

Zucchini Pizza Casserole
from Taste of Home

4 cups shredded unpeeled zucchini
1/2 teaspoon salt
2 large eggs
1/2 cup grated Parmesan cheese
2 cups (8 ounces) shredded part-skim mozzarella cheese, divided
1 cup (4 ounces) shredded cheddar cheese, divided
1 pound ground beef
1/2 cup chopped onion
1 can (15 ounces) Italian tomato sauce
1 medium sweet red pepper, chopped

Preheat oven to 400°. Place zucchini in colander; sprinkle with salt. Let stand 10 minutes, then squeeze out moisture.

Combine zucchini with eggs, Parmesan and half of mozzarella and cheddar cheeses. Press into a greased 13x9-in. or 3-qt. baking dish. Bake 20 minutes.

Meanwhile, in a large saucepan, cook beef and onion over medium heat, crumbling beef, until meat is no longer pink; drain. Add tomato sauce; spoon over zucchini mixture. Sprinkle with remaining cheeses; add red pepper. Bake until heated through, about 20 minutes longer.

Freeze option: Cool baked casserole; cover and freeze. To use, partially thaw in refrigerator overnight. Remove from refrigerator 30 minutes before baking. Preheat oven to 350°. Unwrap casserole; reheat on a lower oven rack until heated through and a thermometer inserted in center reads 165°. Yield: 8 servings.

Other Zucchini Recipes
Zucchini Ribbons With Almond Pesto
Zucchini Bread
Grilled Pizza
Ricotta Pasta with Zucchini and Corn
Italian Greens Soup (Ed Fretwell Soup)
Vegetarian Fajitas
Summer Squash Sauté
Ratatouille
Roasted Vegetable Minestrone

Slow Cooker Honey Sesame Chicken

0

Category: ,


Most of us home cooks have long known how valuable a slow cooker is.  How great is it to put a bunch of ingredients into the pot, turn it on, and hours later be rewarded with a great aroma and a (hopefully) tasty meal?

Now I'm going to share a revelation that most of you moms will laugh and roll your eyes at, but I had the impression that when I stayed at home with my baby, I'd have all this extra time to cook and clean.  I'll pause while you wipe the tears of laughter from your eyes.

All better and composed now?  Ok.  So anyway, I've now figured out how difficult it is to care of a baby and brush your teeth, let alone cook a meal, and I'm back to the time we decided to try to become champions of the slow cooker.  We still have a long way to go, but I've added another recipe to my fairly small repertoire- slow cooker honey sesame chicken.  If you like Asian inspired foods, then this one is right up your alley.  It's easy and light, with a sauce that works nicely over rice or with noodles.  I love, too, that it's made with ingredients found in your home and not ones that you'd need to visit the Asian market to find.  I made it for my sister and me to eat one evening, and we both agreed this recipe is a keeper.

I slightly changed some of the recipe, so I'll post what I did, and the recipe title is a link to the original.

Slow Cooker Honey Sesame Chicken
adapted from Lindsay Weiss

1 1/4 pound boneless, skinless chicken breasts (thighs would be fine too)
Salt and pepper
1/2 cup honey
1/4 cup soy sauce
2 tablespoons diced onion
2 tablespoons ketchup
1 teaspoon nut or seed oil (I used flax oil)
2 teaspoons canola oil
1 clove garlic, minced
1/4 teaspoon red pepper flakes (optional)
1 1/2 tablespoons cornstarch
1 small package snow peas (not frozen, from the produce section)
Sesame seeds

Cut chicken into cubes or strips.  Season chicken with lightly with salt and pepper, put into crock pot. In a small bowl, combine honey, soy sauce, onion, ketchup, oil, garlic and pepper flakes. Pour over chicken. Cook on low for 3-4 hours or on high 1 1/2 – 2 1/2 hours, or just until chicken is cooked through. Remove chicken from crock pot, leave sauce. Stir in corn starch until completely dissolved. Replace lid and cook sauce on high for ten more minutes or until slightly thickened. Cut chicken into bite size pieces, then return to pot and toss with sauce before serving. Stir in snow peas. Sprinkle with sesame seeds and serve over rice or noodles.

Notes

  • The original recipe called for sesame oil, and the one time I bought it for a meal I didn't like it at all, though that may have been toasted sesame oil.  Anyway, I used flaxseed oil, because weirdly enough I did have some of that.  I imagine almost any seed or nut oil would work, and if all else fails, just leave it out.
  • I used a small slow cooker (1 qt) and this cooked quickly.  I used chicken breasts, but next time will use thighs as the breats were just slightly tough.

Meatless Mondays: Skillet Baked Ziti

0

Category: , , ,


Y'all, I have had this recipe in the stack for almost seven years.  It was way past time to try this one out, and now that I did, I know I'll be going back again and again.  This baked ziti is easy, quick, and tasty, and has a big bonus: the leftovers stay moist and well sauced, which as you may know, is a hazard with baked pasta dishes.  Both Drew and I really enjoyed this.  Drew even said it may be the best he's had, which is saying a lot, because he used to live in Upstate New York, where there's a lot of Italian influence.

Read More

Slow Cooker Turkey Meatloaf

0

Category: ,


A while back, Drew and I decided we should try to be champions of the slow cooker.  We're not quite there yet, but we're working on it.  This recipe for slow cooker turkey meatloaf will definitely be one we will make again.  Thanks to friends Charlotte and Amanda for giving me the recipe!

I'll be up front that at first I wasn't sure about this meatloaf.  I didn't love it at first bite.  I didn't really know what I thought, but as I ate on it a little more, I really started to like it.  It feels lighter and healthier than a lot of meat dishes.  I really enjoyed the vegetables flecked through the meatloaf.  One thing that I think is a real key in liking any healthy food makeover is not expecting it to taste like the regular version of itself.  Just be open to it tasting like its own thing.  Turkey will never be beef, spaghetti squash will never be spaghetti.  Amen.

Read More

For Your Weekend: Baked Sweet and Sour Chicken

0

Category: ,


Last weekend I made this dish for dinner and wanted to tell you about it.  This sweet and sour chicken was so good!


Earlier on, I needed some meal inspiration.  I wanted to make something a little different, but still fairly healthy, and since Aldi had pineapples for $1 and I had a ripening one on my counter I wanted to use, I searched my Pinterest board of food to try and this one jumped out at me.  It was so pretty!  It uses pineapple!  It's baked!

Read More

Throwback Thursday: My Mom's Chicken Nuggets

0

Category: ,


Few things are as appealing to a child as the chicken nugget, am I right?  Usually even the pickiest eater will go for the chicken nugget.  Even though I don't remember being a very picky eater as a child, these still ranked at the top of my food list, and they still hold a special place in my food-heart.  All partiality aside, these are really good chicken nuggets.  I give them my highest "MAKE THESE" recommendation, whether you're feeding a family or need a party finger food.  I'll give my tips for dressing these up in the recipe.

My Mom's Chicken Nuggets
feeds 4 a meal sized portion or more for appetizer portions

4 chicken breasts, cut into 1" cubes
1 cup dry breadcrumbs
1/2 cup Parmesan Cheese
1 tsp. salt
2 tsp. dried thyme
2 tsp. dried basil
1 stick butter, melted

Preheat your oven to 400.  Mix together the breadcrumbs, cheese, salt, and herbs.  Dip chicken into the butter and roll in the crumb mixture.  Place on a baking sheet and bake for 15 minutes, rotating the chicken about halfway through.

If you want to jazz it up a little, sub in some freshly grated Parmesan or Parmigiano Reggiano (or any other hard Italian cheese) or replace some of the breadcrumbs with panko breadcrumbs that have been crushed up a little.

Notes

  • Italian Seasoning also works very well in place of the two herbs and adds a little more variety.  It's all about using what you have in your pantry.


Slow Cooker Lasagna

0

Category: , ,


Oh my goodness.  It's been a crazy last few weeks.  There's nothing incredibly out of the ordinary going on, but the last few weeks have felt busier, more hectic.  I realized it's been a while since my last recipe share with you.  Slow cooker meals are needed now more than ever, right?  A few years back, Drew and I decided to try to become champions of the slow cooker.  We're still (very slowly) working on it, and this recipe will definitely be in our rotation for the future.  It's delicious and just gets better as it sits for a few days.


The upside to this lasagna recipe is that the slow cooker stretches out the baking process, allowing you to run errands or whatever while it cooks.  One downside is that the directions call for you to cook it only about 4-6 hours, and it was definitely done in that time.  I brought my slow cooker to work to be able to monitor it and it made the entire building hungry that afternoon.  Another upside is that the lasagna stayed nice and moist.

Slow Cooker Lasagna
adapted from Allrecipes user KIMIRN
feeds 6-8

1 pound lean ground beef
1 onion, chopped
2 teaspoons minced garlic
1 (29 ounce) can tomato sauce
1 (6 ounce) can tomato paste
1/4 to 1/2 cup water
1 1/2 teaspoons salt
1 teaspoon dried oregano
1 (12 ounce) package lasagna noodles
12 ounces ricotta cheese
1/2 cup grated Parmesan cheese
12 ounces shredded mozzarella cheese

In a large skillet over medium heat cook the ground beef, onion, and garlic until brown. Add the tomato sauce, tomato paste, water, salt, and oregano and stir until well incorporated. Cook until heated through.

In a large bowl mix together the cottage cheese, grated Parmesan cheese, and shredded mozzarella cheese.

Spoon a layer of the meat mixture onto the bottom of the slow cooker. Add a double layer of the uncooked lasagna noodles. Break to fit noodles into slow cooker. Top noodles with a portion of the cheese mixture. Repeat the layering of sauce, noodles, and cheese until all the ingredients are used.
Cover, and cook on LOW setting for 4 to 6 hours.

Notes

  • One thing I do love about Allrecipes is the user reviews.  Reading those with the recipe help see potential pitfalls or slight modifications.  A common one with this recipe was complaints of the lasagna being too dry.  I added extra water to the sauce to make sure the noodles (which I did not cook ahead of time and they were not labeled as "no cook") cooked and didn't take too much moisture.  The noodles were a bit soft, but the lasagna was pretty perfect in terms of moisture.  

Pan Seared Bass with Grapefruit Salad

0

Category: ,


A while back, we got a Groupon for the Clean Catch Fish Market in Charlotte and finally bought some fish with it.  We took home arctic char and black bass.


I'm not sure that I've ever made bass, so I didn't know how most people cooked it.  After a short recipe search, I landed on today's recipe, brought us from Anne Burrell from her Food Network Show, Secrets of a Restaurant Chef.  It's a fairly simple recipe that really cooks the fish well (by pan searing it) and gives you a really good meal that would be a good fancy-dinner-at-home meal in something like 15 minutes.


The only thing I'd do differently is that I might try to either season the fish better next time, or add some other flavor element to the fish itself- maybe a sauce or drizzle with the grapefruit juice.  The fish was cooked well- moist, flaky and tender- but it was a little on the bland side.  On a positive note with that, if you don't like strong fish, this is an ideal choice.

Seared Black Bass with Bitter Greens, Grapefruit, and Feta Salad
from Anne Burrell

recipe is written to feed four people.

Extra-virgin olive oil
Four 6-ounce black bass fillets
Kosher salt
5 to 6 cups bitter greens, such as arugula, dandelion, escarole, radicchio, endive or frisee
1/2 small red onion, thinly sliced
1/2 ruby red grapefruit, juiced
1/4 cup pitted gaeta or kalamata olives, slivered
2 ruby red grapefruits, supremed
3/4 cup crumbled feta

Coat a large saute pan with olive oil and bring to a high heat. Coat the bottom of another smaller saute pan with olive oil. Sprinkle the fish with salt on both sides. When the large saute pan is screaming hot but not quite smoking, lay the fish fillets in the pan, skin-side down. Do not crowd the pan, you may have to work in batches. After you put the fish in the pan, place the other small saute pan directly on top of the fish fillets. This applies gentle pressure to the fish and forces the skin to have contact with the pan and will create crispy skin. Cook the fish for 3 to 4 minutes and then remove the top pan. Shake the pan a little to unstick the fish. Use a fish spatula and flip the fish fillets and cook for 2 more minutes on the other side. Remove from the pan and serve or keep warm until the remaining fish is cooked.

In a large mixing bowl, dress the greens and red onions with olive oil and grapefruit juice and season with salt. Toss in the olive slivers and grapefruit supremes.

Divide the salad among 4 serving plates and sprinkle with feta. Lean a fish fillet on each salad. Serve immediately.

How to supreme any citrus- cut a bit off the top and bottom of the fruit, and sit it on a cutting surface.  With your knife, cut the peel off, cutting small sections straight down from the top.  Then, slice in between the membrane separating each slice of fruit to segment it.  Then you get a supremed citrus, or slices without peel/membranes.

Scallion Crusted Arctic Char

0

Category: ,


Happy New Year!  And now we begin the efforts to offset all that holiday indulgence.  I'm not sure if we are ingrained to start eating lighter in the new year because of resolutions or just because we feel so weighed down by the holiday eating extravaganza, but I know that come January, my brain and body are ready for a change from the season of eating.  


I wanted to share this recipe with you because it's lighter, but still a little on the indulgent side.  Arctic Char looks almost just like salmon, but this fillet was thicker and a little lighter colored than the wild caught salmon I find around here.  Its flavor is a little lighter than wild salmon's, but it's still unique.  This was so good.  


Green onions are sliced thin and mixed with just enough mayonnaise to bind them, and it's all slathered on the fillets.  The whole thing is then broiled and dinner is ready in something like 10 minutes flat.  Serve with a salad and roasted potatoes and you have a restaurant quality dinner that is completely in keeping with your resolutions...or your desire to not have another dish with 3 pounds of cheese or cream of anything soup.

Scallion Crusted Arctic Char
from Gourmet via epicurious.com
feeds 2-4, depending on appetite

4 to 6 scallions
1 tablespoon mayonnaise
2 (6-ounce) pieces arctic char fillet
preparation

Preheat broiler. Line rack of broiler pan with foil.

Finely chop scallions and stir together with mayonnaise. Pat fillets dry. Place fillets, skin sides down, on broiler pan and season each fillet with a generous pinch of salt and pepper. Spread scallion mixture evenly over tops of fillets.

Broil 3 to 4 inches from heat until scallions are slightly charred and fish is just cooked through, about 8 minutes.

Taco Pizza

0

Category: ,


I just love a good homemade pizza.  It's a fun thing to make, and the whole family can get involved.  It's also a really good time to get creative with toppings.  This particular one is inspired by the taco pizzas I used to get in elementary school and the ones occasionally seen at pizza buffet restaurants.


The base for the pizza is chili, instead of tomato sauce, and let me tell you, it was such a good idea.  I used this chili recipe, which is one of my favorites, but you could probably use any chili or chili- like soup.  It's a creative way to use up leftovers.  I put down some of the chili, and then topped it with cheese and sliced green bell pepper.  I baked it in the oven until the crust was browned and the cheese was bubbly.  


I then topped it with sliced Romaine lettuce, avocado, and more cheese, because more cheese is always a good thing.  It was so good!  Make this soon for a fun way to use up some of your big batch chili leftovers.

Taco Pizza
all ingredients may be adjusted to feed your crowd.

1 pizza dough ball or prepared pizza crust
1-2 cups chili
1 cup cheddar or other cheese of your choice
1 cup shredded lettuce
1/2 avocado, diced
Salsa or taco sauce

Preheat your oven to its highest setting and place a pizza stone in the oven on the center rack.  Allow it to preheat for about 30 minutes to 1 hour.

Meanwhile, prep your crust according to recipe or package directions.  Top with a thin layer of chili and cheese and bake for about 10 minutes, or until crust is browned and toppings are melted and bubbly.

Remove from oven  and allow the pizza to rest on a cooling rack about 2-3 minutes.  Top with lettuce, some remaining cheese, and the diced avocado.  You can also top with salsa or taco sauce for additional taco flavor.  Slice and serve.

Pinterest Find: Maple Dijon Chicken

0

Category: ,


Can you ever have too many chicken dishes?  Especially when they're easy and deliver a huge amount of results in relation to the ingredients and time you spent putting the dish together?


This was one of the first dishes I ever pinned to my food board, and after nearly 3 years on Pinterest I am finally trying it out, and I'm glad I did.  It's really good.  It's a solid recipe for your repertoire that is one of those go-to, sure bets.  It's almost stupid-easy and is quick to prepare.  Serve with a salad or other vegetables on the side.

Maple Dijon Chicken
from Witty in the City blog

1.5 lb package of boneless, skinless chicken thighs (about 6 thighs)
1/4 cup pure maple syrup
1/2 cup Dijon mustard
1 Tb vinegar (rice/rice wine/white wine/apple cider)
1/2 tsp fresh rosemary, chopped

Preheat oven to 450.  Line a 9x13" baking dish or pan with aluminum foil for easy cleanup.  If you wish (and I did), trim excess fat from thighs and salt and pepper both sides.  Place into a single layer into the dish.

In a small bowl or mixing cup, mix together the maple syrup, the Dijon mustard, and the vinegar.  Pour over the chicken, turning the chicken to coat.  Bake the chicken in the preheated oven for a total of about 40 minutes, or until the internal temperature of the thighs reaches 165.  About halfway through cooking time, baste and or turn the thighs in the sauce for even cooking and flavor distribution.

Remove from oven and sprinkle rosemary on top of the chicken.


Salmon with Lemon and a Creamy Dill Sauce

0

Category: ,


This was our Sunday after church meal this week, but it could just as easily be a Tuesday night after work meal, too.  Fish is so quick to prepare that you can have a special meal on the table in about 20 minutes.  I found this one on Pinterest of all places, and I think we both really enjoyed it- the salmon flavor was allowed to come through, while being complemented by the olive oil/lemon mixture, and the creamy dill sauce played nicely with those flavors, too.


The whole dish can be made in about 20 minutes, including oven pre-heat time, and it has a short ingredient list, but packs quite a bit of flavor.  This will definitely be on my "make again" list. 


What are some of your favorite quick meal suggestions?

Baked Lemon Salmon With Creamy Dill Sauce
adapted from Cooking Classy blog

to serve 2-3 adults

1- 8-10 oz portion of salmon
1 Tbsp extra virgin olive oil
1 1/2 tsp lemon zest
2 Tbsp fresh lemon juice
Salt and freshly ground black pepper

Creamy Dill Sauce
1/3 cup plain Greek Yogurt
3 Tbsp mayonnaise
1 clove garlic, finely minced
1 tsp. dried dill
2 - 3 tsp milk
Salt and freshly ground black pepper

Preheat oven to 400 degrees. In a bowl, whisk together olive oil, lemon zest and lemon juice. Grease a 8X8-inch baking dish and place salmon fillet in baking dish. Season tops of salmon with salt and pepper then rotate to opposite side. Drizzle tops evenly with lemon mixture and gently rub over salmon.  Let rest at room temperature 10 minutes, then bake in preheated oven 10 minutes, or until salmon has cooked through (cook time will vary based on thickness of fillets and how well done you liked them). Serve warm topped with Creamy Dill Sauce, which you can make while salmon bakes.
For the sauce:
In a bowl, mix together Greek yogurt, mayonnaise, garlic, dill, honey, and enough milk to reach desired consistency. Season with salt and pepper to taste. If you make this ahead of time, store in refrigerator, allow to rest at room temperature 20 minutes before serving (just so it's not ice cold over warm salmon).

One Year Ago:  Honey Apple Cake
Two Years Ago:  Slow Cooker Chicken Cacciatore over Polenta
Three Years Ago:  Swiss Chard Ravioli
Four Years Ago:  Hamburger Buns


Smoked Chicken Wings

0

Category: , , ,


Do you smoke?  If there's any kind of smoking I can get behind, it's smoking meat.  Drew is our resident grill master, and he's been experimenting with smoking chicken in our kettle grill, and has been pretty successful with his outcomes.  Most recently he smoked chicken wings as opposed to a whole chicken, and they are good. 

                    
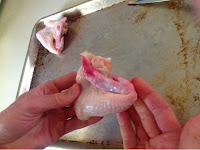
The the three part chicken wing fold
   
Smoking can either be done cold or hot.  This one falls into the hot category (I think).  The process is a bit detailed and it has several steps.  The recipe, from start to finish, will take around two hours.  The techniques, though, are simple, and I'd say even a pretty inexperienced person could do this if he or she pays attention to the steps. 


What makes the detail and time spent worth it is the huge payload of flavor.  Somehow the meat retains its moisture, and picks up a nice smokiness that complements rather than overpowers the flavor.


The technique that Drew employed is called the Snake Method, and it utilizes a combination of unlit coals, wood, and lit coals.  The pictures above demonstrate the setup steps.  The Snake Method allows the unlit coals to begin burning and continue the smoking process without having to disturb the meat as it smokes/cooks to replenish coals.  This method has so far given us consistent temperature and longevity of coals.

The first chicken wings go on- notice the drip pan below!

Alchemy- from this


To this.


He has now also done a whole chicken, turkey, and I think chicken leg quarters, all using this method, and it comes out nice.  The meat is great straight off the grill, on sandwiches, whatever.


Smoked Chicken Wings
feeds 2 people

2 lbs chicken wings
Salt and pepper

Place 4-5 chunks of wood (we used hickory) in a bowl and cover with water.  Keep submerged using a plate covered with water.  Soak approx. 30 minutes.

Prep your chicken by folding the wing tip under, making a triangle with the wings.  Pat dry with paper towels, and season well with salt and pepper.  Set aside until grill is ready.

Prep your grill:  in a kettle grill, lay down two rows of charcoal briquettes, about 1/3 of the way around the circumference.  Stack coals on top of these, about 3 briquettes high.  Put enough coals in a chimney starter to cover the bottom and light the chimney starter using newspaper.  Since there are so few, this only takes about 10-15 minutes.  When the coals are hot, dump the coals on one side of the charcoal snake, and lay the wood on top of the lit and the first part of the unlit coals, with even spacing of about 1-2 inches in between.

Place an aluminum drip pan (or a makeshift one from 3 layers of aluminum foil) in the middle of the grill and place the grate on top.  Oil your grate, and place your chicken directly over the drip pan.

Place the lid on the grill, and maintain grill temperature between 250 and 275.  Cook for about an hour or until the wings have an internal temp. of 165.  Remove from grill and allow to rest before eating, about 5-10 minutes.

Notes

  • The wings take the shortest of anything we've done so far.  The method stays the same, but the temperature and cook times may vary.  
  • These were really good with bbq sauce.