spoon
Showing posts with label Snacks. Show all posts

Barbecue Chicken Sliders

0

Category: ,


Every family, every cook has their simple favorites, the recipes that are go-to's for busy nights or times where you just aren't sure what to cook.  They are not fancy, and they're not what you would make for your audition for Master Chef, but they are what you make for your family on, say a Tuesday.  You often don't even need to pull out a cookbook or smart phone to make it- you know how it's done.  What are some of your recipes/dinner ideas like that?  Let me know in the comments :)

This is one of those recipes for me.  It's not even really a recipe, just a meal idea that I can pull together in about 10 minutes that is a consistent winner.  My family got the idea from an old Kraft Food and Family magazine years ago, and we've all been making it since.  These barbecue chicken sliders are a healthy, tasty favorite that is always a good answer to the question, "what's for dinner?"

Oh, and since you likely won't need a whole chicken, these are either perfect to use up leftover chicken or they're good to keep in mind that you'll be able to get two meals out of your chicken.

Barbecue Chicken Sliders
from Kraft Foods

To feed 4 people generously

1- 12 pack of Hawaiian sweet rolls (any roll will do, but these put it over the top)
1/2 cooked chicken, about 2-3 cups (rotisserie is perfect here), pulled from bone and shredded
1 cup bbq sauce of your choice
1/2 pkg. broccoli slaw mixture
1/2 cup ranch dresssing

In a medium bowl, combine the chicken and the bbq sauce.  Drew actually prefers the chicken to be plain and the sauce to be spooned over the top, so this step is optional.  In another small to med. bowl, combine the ranch dressing and slaw mixture.

Assemble the sandwiches by cutting the rolls in half and, if desired, scooping out some of the bread to make the chicken and slaw better fit.  On the bottom half of the roll, place the chicken and top with some of the slaw.  Top with the top half of the roll, and done.

Serve with chips, fries, or a salad (broccoli, pasta, potato).  

Fire Roasted Salsa

0

Category: , , , , ,


My go-to salsa during winter when fresh tomatoes aren't available is the Pioneer Woman's Restaurant Style Salsa.  It has an impressive flavor and is quick and easy to boot.  I've made it dozens of times, and each time there's just never enough, even though it makes a ton.

I can't remember if this salsa remix was born out of the desire to experiment or just because I didn't have plain tomatoes, but a couple weeks ago I decided to try making the salsa with fire roasted tomatoes instead of plain ones.  This discovery has to rank right up there with sliced bread.  It's more complex- slightly smoky, spicy, and the flavor just feels...deeper.  It's so good!

Read More

Chocolate Sugar Cookies

0

Category: , ,


What do you think of when you think of a Christmas cookie?  I'll tell you what comes to my mind, and maybe some of our thoughts are the same, or maybe they'd be completely different:
  • Sugar cookies, rolled out, punched into shapes like bells, trees, stars, mittens, reindeer, and decorated with frosting or sprinkles
  • Gingerbread men and houses
  • Fruitcake Cookies (I can't believe I've never given the recipe- will try to fix that soon!)
  • Those store-bought slice and bake sugar cookies that are dyed in the middle to look like a Christmas tree or Santa's hat
  • Those small, pre-made butter cookies that have red or green sprinkles and sometimes look like a wreath


Despite all the people who love chocolate, and I am one of them, Christmas is not chocolate's big day.  These cookies, though, just may be its ticket in.  They were originally labeled "chocolate sugar cookies" and Deb Perelman from Smitten Kitchen changed their name to brownie roll out cookies because she felt the name suited it better.  


These cookies have a solid chocolate taste and have the dense texture of a brownie.  I know!  Deb (I write that like we're on a first name basis or something) thinks they'd be ideal for an ice cream sandwich, and I don't doubt that, but I could see these getting some decorating love and replacing the regular sugar cookie or even gingerbread at Christmas.


Either way, the cookies are tasty, and the dough can be frozen for later use.  They're addictive, so beware!

Chocolate Sugar Cookies
from Smitten Kitchen

3 cups all-purpose flour
1/2 teaspoon salt
1/2 teaspoon baking powder
1 cup butter, softened
1 1/2 cups sugar
2 large eggs
1 teaspoon vanilla extract
2/3 cup unsweetened cocoa

Preheat oven at 350 degrees. Whisk dry flour, salt and baking powder in bowl and set aside. Mix butter, sugar, eggs, vanilla and cocoa in mixer. Gradually add flour mixture, and mix until smooth. Wrap in plastic and chill for at least one hour.

Roll out cookie dough on floured counter. Cut into desired shapes, brushing extra deposits of flour off the top. (It does disappear once baked, though, so don’t overly fret if they go into the oven looking white.) Bake on a parchment-lined baking sheet for 8 to 11 minutes (the former for 1/8-inch thick cookies, the latter for 1/4-inch cookies) until the edges are firm and the centers are slightly soft and puffed.

Transfer to a wire rack to cool.

Ranch Dill Cheez-its

0

Category: , , ,


This recipe was shared with me several years ago by my good friend and former co-worker, Cindy.  Thank you Cindy!  She brought them to a party and I think I could have eaten the whole container.  There's just something about the way the cheesiness of the crackers combines with the dill and ranch dressing mix that really creates a memorable, crave-worthy taste.  Disclaimer: don't eat on a date!

Anyway, if you need something to make for a party, these are perfect.  They're easy and fairly quick (30 mins total time) to make, the recipe makes a lot, and they're very transportable and can be made ahead of time, oh and almost everyone finds them irresistible.

Ranch Dill Cheez-its

2 boxes Cheez-its or other cheese crackers
1/2 c. vegetable or canola oil
1 TB. dill
1 package ranch dressing mix

Preheat your oven to 200.  Pour your cheese crackers into a roasting pan or divided between two 9x13 pans.  Combine the ranch and the dill and sprinkle evenly over the crackers.  Mix to combine and distribute.  Pour the oil evenly over the crackers and also stir/mix to combine.

Bake in preheated oven for 10 minutes.  Take the crackers out and stir them around and bake 10 minutes more.

Pinterest Find: Pumpkin Molasses Cookies

0

Category: , , ,


I took these cookies to a Christmas party over the weekend, and they were a surprising hit.  Everyone seemed to really enjoy them, so that's a win.  I wasn't sure how they would be received since they're a cakey cookie.  In fact, I bet they'd make killer whoopie pies.


The dough uses a lot of pumpkin and not a lot of other fats or a ton of sugar, so I'd bet (hope) they would fall on the healthier side of the spectrum, but regardless, they are a nicely spiced cookie for the fall or holiday seasons.


I tried to show in this picture that the dough is more like a batter.  Even after having it in the freezer a couple hours, it was soft and sticky.  I would definitely recommend freezing rather than refrigerating the dough to make it just a little easier to work with.  Once you roll it in sugar, though, the stickiness goes away and you have these little gems below:


Pop them in the oven and they expand like crazy.  If you hate cookie edges running into each other, I'd recommend baking 6-9 per sheet. 

Overall, though, these are tasty little cookies.  They are very soft baked and nicely spiced, with a good pumpkin flavor as well.  After they're all gone, I thought about the whoopie pie/sandwich cookie idea.  Oh, well.  I guess I'll just have to start another batch!

from My Baking Addiction Blog

2 1/3 cups flour
2 tsp baking soda
1/2 tsp salt
1 tablespoon pumpkin pie spice
1/4 tsp black pepper
8 Tbs butter, room temperature
1 cup brown sugar, packed
1/4 cup molasses
2/3 cup pumpkin puree
1 large egg
1/2 cup sugar, for rolling                                

Whisk together the flour, baking soda, salt, pumpkin pie spice, and pepper.

Working with a stand mixer, preferably fitted with a paddle attachment, or a hand mixer in a large bowl, beat the butter on medium speed until smooth and creamy. Add the brown sugar, molasses, and pumpkin puree and beat for 2 minutes, scraping down the sides of the bowl as needed. Add the egg and beat for 1 minute more. Reduce the mixer speed to low and add the dry ingredients, mixing until the flour and spices disappear. If flour remains in the bottom of the bowl, mix the last of the dry ingredients by hand to avoid over beating. You will have a very soft dough.

Divide the dough in half and wrap each piece in plastic wrap. Freeze for at least 30 minutes, or refrigerate for at least 1 hour. The dough is sticky, so the longer time it can chill the easier it is to work with.

Preheat oven to 350 degrees F. Line 2 baking sheets with parchment paper.

Put the sugar in a small bowl. Working with one packet of dough at a time, divide it into 12 pieces, and roll each piece into a ball. Roll the balls in the sugar and use a the bottom of a glass to press down on the cookies until they are between 1/4 and 1/2 inch thick. Transfer to cookie sheets. Do not over crowd.

Bake the cookies one sheet at a time for 12-14 minutes, or until the top feels set to the touch. Remove baking sheets from the oven. Let cookies cool 5 minutes on the sheets before transferring them to a cooling rack.  Repeat with second batch of dough.

Candy Corn Cookies, A Pinterest Find Just in Time for Halloween

0

Category: , , , , , ,


I can't think of any Halloween or fall candy that I like better than candy corn.  It has to be a "good quality" candy corn, and not just any cheap imitation, but the particular taste, that chewy texture...yum!


I saw these cookies on Pinterest and loved how they looked so pretty and chewy, speckled with candy corn.  I made the dough up Monday night and baked up about half of it or so for some of the youth in our church last night.  Drew and I had to sample them beforehand.  You know, to make sure they were OK for others. 


These cookies are wonderful!  As you can see, the candy corn for me did not stay in tact as well as I thought they might, but the soft, chewy dough, mixed with the chewy, sugary candy corn...Halloween treat for sure.  Oh and the dough itself is so tasty that I probably need to keep this in mind when I go to reach for some more.

When they first come out of the oven, they are puffy, but don't worry; they will settle.


from Averie Cooks blog

1/2 cup unsalted butter, soften
3/4 cup light brown sugar, packed
1/4 cup granulated sugar
1 large egg
1 tablespoon vanilla extract
2 tablespoons cream or half-and-half
2 cups all-purpose flour
2 teaspoons corn starch
1 teaspoon baking soda
pinch salt, optional and to taste
1 1/2 cups candy corn (1o to 11 ounces)
1 cup white chocolate chips (or salted peanuts)

To the bowl of a stand mixer fitted with the paddle attachment (or large bowl and electric hand mixer), cream together the first 5 ingredients (through vanilla) on medium-high speed until light and fluffy, about 5 minutes.

Stop, scrape down the sides of the bowl, and add the next 5 ingredients (through optional salt), and mix on low speed until just incorporated, about 1 minute; don't overmix.

Add the candy corn, white chocolate chips (or peanuts), and mix until just incorporated.
Using a medium 2-inch cookie scoop, form heaping two-tablespoon mounds (I made 20). Place mounds on a large plate, flatten mounds slightly, cover with plasticwrap, and refrigerate for at least 3 hours, or up to 5 days, before baking. Do not bake with warm dough because cookies will spread and bake thinner and flatter. Important note - Strategically place candy corn so that it's not baking directly on cookie sheet because it will melt, burn, or turn runny if it is. The candy corn pieces need to be in the interior of the cookies, shielded and buffered by dough.

Preheat oven to 350F, line a baking sheet with a Silpat or spray with cooking spray. Place mounds on baking sheet, spaced at least 2 inches apart (I bake 8 cookies per sheet) and bake for about 9 minutes, or until edges have set and tops are just beginning to set, even if slightly undercooked, pale and glossy in the center. Do not overbake because cookies will firm up as they cool. Baking longer than 10 minutes could result in cookies with overly browned undersides. 

Allow cookies to cool on the baking sheet  for about 5 minutes before transferring to a wire rack to finish cooking. Cookies will keep airtight at room temperature for up to 1 week or in the freezer for up to 4 months. Unbaked cookie dough can be stored airtight in the refrigerator for up to 5 days, or frozen for up to 4 months, so consider baking only as many cookies as desired and save the remaining dough to be baked in the future when desired.


Notes

  • If you visit the original post site (the link to the original post is the recipe title), you will see that Averie's cookies are a bit thicker.  I used about half the dough she uses for one cookie, so that I'd have more.  This may have affected the candy corn staying in tact.
  • I baked mine 9 minutes, just like the recipe suggested.  Some still looked too underdone, and even after about 5 mins. were too soft to pick up from the baking sheet.  After further cooling- maybe 30 minutes- they were fine to pick up.

Homemade Baked Tortilla Chips

0

Category: , , , , ,


This post was borne out of necessity.  One day we were having fajitas, and we realized I forgot to buy tortilla chips, which as you know is a travesty, being that there's all that salsa just begging to be dipped.  We did, however, have a bunch of 6- inch corn tortillas, and so I decided to try to bake some up, and you know what?  They turned out awesome.  They're sturdy, have good flavor, and they almost have layers.  We loved them.


I used a Misto sprayer to get the oils nice and evenly distributed, and sprinkled them with Kosher salt.  I then baked them up and we ate them like our lives depended on it.  The corn tortillas, as opposed to the flour tortillas, stay nice and crispy, even a day or two after you bake them, which is nice if you want to make a batch to have for later snacking.


If you make these for a party, then you will want to start early.  I could only fit about 4 whole tortillas on a baking sheet, and that's only like 1 serving.  So yes, I ate a whole pan.  I'll go be filled with self loathing now.

Baked Corn Tortilla Chips
to make 1-2 servings

4- 6 inch corn tortillas
Canola or other flavorless oil OR cooking spray/spray oil
Salt (I use Kosher but regular would be fine)

Preheat an oven to 350 and center your oven rack.  Line a baking sheet with foil or parchment (optional, but makes for much easier cleanup).

Cut your tortillas into quarters (or whatever size you desire- sixths would be fine too).  Lay them flat in a single layer on your baking sheet, and spray with oil.  You can use a Misto sprayer, a pump sprayer, or even a spray bottle with a nozzle, or even cooking spray- you just want an even, light layer of oil on the chips.  Sprinkle with salt.  Turn over and repeat on the other side.

Bake in preheated oven about 10-15 minutes, flipping about halfway through.  They are done when they've crisped up and are golden with some light browning.

Notes

  • Depending on your love of salt, you may want to go easy at first.  Remember you are salting both sides (or just salt one side if you were heavy handed on the first side).  These can tend to be a little salty if you aren't careful.
  • Despite their sturdiness, they get soggy more easily than the store bought chips.  Be warned.


Almond Snack Mix

0

Category: , , ,


Hi!  I'm coming to you today with a good snack idea.  Eating between meals can be such a pitfall for those of us who want to eat healthy, but get really hungry about 3:30 pm or crave something sweet in the afternoons.  This snack mix is a really good answer to that.  I got the idea from one of my former Zumba participants and have since made it a lot, and likely adjusted the ratios of ingredients.

It's simple and customizeable, so let it fit your tastes.  I love the combination of almonds, dried cranberries, and dark or bittersweet chocolate chips.  I'm not a nutritionist, but this has protein from the almonds, and the chocolate and dried fruit answer that sweet craving in a less guilty way.

Almond Snack Mix

1 cup raw almonds
1/2 cup dried fruit (cranberries, mixed fruit, raisins)
1/2 cup chocolate chips

Mix all ingredients together and store in an airtight or resealable container.  Try to enjoy no more than 1/4 to 1/2 cup at a time!  Note: the ratio I am using here is 2 parts almonds to 1 part each dried fruit and chocolate chips.  Feel free to play with your own combination.  

Smoked Chicken Wings

0

Category: , , ,


Do you smoke?  If there's any kind of smoking I can get behind, it's smoking meat.  Drew is our resident grill master, and he's been experimenting with smoking chicken in our kettle grill, and has been pretty successful with his outcomes.  Most recently he smoked chicken wings as opposed to a whole chicken, and they are good. 

                    
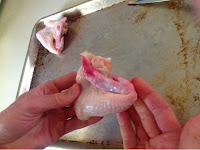
The the three part chicken wing fold
   
Smoking can either be done cold or hot.  This one falls into the hot category (I think).  The process is a bit detailed and it has several steps.  The recipe, from start to finish, will take around two hours.  The techniques, though, are simple, and I'd say even a pretty inexperienced person could do this if he or she pays attention to the steps. 


What makes the detail and time spent worth it is the huge payload of flavor.  Somehow the meat retains its moisture, and picks up a nice smokiness that complements rather than overpowers the flavor.


The technique that Drew employed is called the Snake Method, and it utilizes a combination of unlit coals, wood, and lit coals.  The pictures above demonstrate the setup steps.  The Snake Method allows the unlit coals to begin burning and continue the smoking process without having to disturb the meat as it smokes/cooks to replenish coals.  This method has so far given us consistent temperature and longevity of coals.

The first chicken wings go on- notice the drip pan below!

Alchemy- from this


To this.


He has now also done a whole chicken, turkey, and I think chicken leg quarters, all using this method, and it comes out nice.  The meat is great straight off the grill, on sandwiches, whatever.


Smoked Chicken Wings
feeds 2 people

2 lbs chicken wings
Salt and pepper

Place 4-5 chunks of wood (we used hickory) in a bowl and cover with water.  Keep submerged using a plate covered with water.  Soak approx. 30 minutes.

Prep your chicken by folding the wing tip under, making a triangle with the wings.  Pat dry with paper towels, and season well with salt and pepper.  Set aside until grill is ready.

Prep your grill:  in a kettle grill, lay down two rows of charcoal briquettes, about 1/3 of the way around the circumference.  Stack coals on top of these, about 3 briquettes high.  Put enough coals in a chimney starter to cover the bottom and light the chimney starter using newspaper.  Since there are so few, this only takes about 10-15 minutes.  When the coals are hot, dump the coals on one side of the charcoal snake, and lay the wood on top of the lit and the first part of the unlit coals, with even spacing of about 1-2 inches in between.

Place an aluminum drip pan (or a makeshift one from 3 layers of aluminum foil) in the middle of the grill and place the grate on top.  Oil your grate, and place your chicken directly over the drip pan.

Place the lid on the grill, and maintain grill temperature between 250 and 275.  Cook for about an hour or until the wings have an internal temp. of 165.  Remove from grill and allow to rest before eating, about 5-10 minutes.

Notes

  • The wings take the shortest of anything we've done so far.  The method stays the same, but the temperature and cook times may vary.  
  • These were really good with bbq sauce.

Frozen Chocolate Covered Banana Slices

0

Category: ,


These kind of make me think of Arrested Development.  If you are unfamiliar with the show, the family has a frozen banana stand.  So, this is a snack that makes me snicker, but it is absolutely delightful.  These chocolate covered slices take a bit of work, but it's easy and completely worth it.  This may be my new favorite warm weather treat.  They're a good combination of healthy and decadent, and I wish I had some to munch on right now, because it's hot outside and, well, do you need a reason to want these?

Frozen Chocolate Covered Banana Slices
1 banana, cut into 1/2 inch slices
1 cup bittersweet or semisweet chocolate chips or 6 oz chocolate, broken/cut up
1 Tb coconut oil

In the microwave or in a double boiler, melt your chocolate and coconut oil (see notes).  Dip the banana slices into the melted chocolate and use 2 forks (my favorite method) to flip and coat the slices in chocolate while draining off the excess.  Place the chocolate coated banana slices on a wax or parchment paper lined baking sheet and place the whole thing in the freezer.  Freeze slices approx. 2 hours or until frozen through.  At this point they may be stored in a zip top bag or other resealable container, if they last that long.

Notes
  • If you melt your chocolate chips/coconut oil in the microwave, place the chocolate and oil into a microwave safe bowl and microwave on high for 30 second intervals, taking out to stir at the end of each interval.  Total melt time is around 2- 2.5 minutes.  
  • If you melt your chocolate chips on the stove top, you will want to use a double boiler.  To do this, place your chocolate and coconut oil in a small to medium glass or metal bowl.  Put about an inch of water in the bottom of a small-medium saucepan and place the bowl inside.  The bowl should not be so small that it touches the water or the bottom of the pot.  Heat on medium-high until the water starts to boil, and then cut the heat back so that the water is at a simmer.  Stir chocolate and oil as it melts and keep the water heated to maintain consistency. 

Fun Breakfast Idea: Breakfast Banana Split

0

Category: ,


Yes, there is a banana under all that granola.  ISN'T THIS THE FUNNEST BREAKFAST IDEA EVER?!?  It's so fun, I went all rogue grammar on you.  If your child reads this post, I apologize and no, funnest is not really a word.  Some things, though, go beyond proper vocabulary.  

I can't take credit for the idea; I got it from one of the people at The Green Room in Hendersonville, NC.  It was on their menu I first saw this idea, and I actually told them I was going to steal it.  I've been eager to make it and share it with you since I first saw it a couple months ago.  

The concept is incredibly simple, but healthy and satisfying: a banana is split in half and then topped with Greek yogurt, granola, and fruit.  If your sweet tooth is really amped up, add a drizzle of honey.  I left mine plain.  This is so good, and quick and easy to make.  I hope it makes your mornings a little more fun!

Breakfast Banana Split
serves 1 breakfast

1 banana, split lengthwise
1/3 cup Greek yogurt 
1/4 cup granola
1/4 cup fruit, chopped or left whole if small

On a small plate or inside a dish that can accommodate the length of the banana, place the banana.  Top it with the yogurt, granola, and fruit.  If you wish, add a drizzle of honey.  Enjoy!

Notes
  • This recipe leaves a lot of room for customizing.  Choose whatever flavor of yogurt you want.  I prefer plain.  You can also choose whatever granola and fruit.  In my case, I only had blueberries, but I bet this would be great with just about any berry, stone fruit, dried fruit, etc.
  • I used this recipe of granola sans fruit, but feel free to purchase if you don't want to make it!

Zucchini Bread Revisited

0

Category: , , , , ,


We grew zucchini for the first time in our garden this year, and it really produces a nice yield.  Each year I work on more and different ways to incorporate it into our diet, just to see all the ways in which it can be used.  We've tried a few this year, and I'm not finished yet.  Zucchini bread is not new, but it sure is good, and I realized as I looked at my old post on it that I didn't write the recipe out correctly.  Oops, sorry!


Zucchini bread is a quick bread, so you can make it into loaves, muffins, or a cake using your favorite tube pan.  "Zis cake has a hole!"- name that movie! 


They freeze well and can make a nice homemade gift.  It comes together easily and is so good.

Zucchini Bread
Adapted from Southview Bapt. Cookbook/Joyce Riley

3 cups flour
2 tsp. baking soda
1 tsp. salt
1/2 tsp. baking powder
1 tsp. cinnamon
3/4 c. chopped pecans
3 eggs
1 3/4 cups sugar
3/4 cup vegetable oil
1 Tb. vanilla extract
1 tsp. almond extract
2 cups shredded, unpeeled zucchini
1- 8 oz can crushed pineapple, drained

Preheat oven to 350 degrees.  Prep either two loaf pans, two muffin tins, or a tube pan by spraying with oil or cooking spray and coating with flour (or in the case of muffin tin, use liners).  In a large bowl, stir or sift together dry ingredients (flour- cinnamon).  In a medium bowl or large measuring cup, mix together the eggs, oil, sugar, and extracts.  Pour the wet ingredients over the dry ingredients and mix until just blended.  Stir in the pecans, zucchini, and pineapple.  Pour the mixture into your pan(s), distributing the batter evenly throughout the chosen pans.  Bake loaf pans for approx 1 hour, muffins 18-20 minutes (or longer, depending on your oven), or a tube pan for around 45 minutes to 1 hour.  Bread is done when lightly browned and a tester comes out clean.

Notes

  • The original recipe called for a full cup of oil and 2 cups of sugar.  In an effort to reduce the greasiness of the bread, I decreased the oil, and have found about 3/4 cup to be a good amount.  You may need to go up or down depending on your own tastes and preferences.  Same with the sugar.  
  • I added almond extract where it was not previously included in the recipe, and reduced the vanilla extract.  The original recipe calls for 2 Tb. vanilla and no almond.  I think the almond helps increase the sweetness while reducing the overall sugar content.  


Crunchy Roasted Chickpeas

0

Category: , , , ,


I am always the last person to know about something.  Juicy gossip?  All dried up by the time I hear about it.  Not that gossip is good, but you get my point.  I am not the person to ask about what's going on.  I'm also not a trendy person.  I'm that person wearing some of the same pieces she wore in high school.  

The same goes with food, which brings me to today's recipe.  I first saw the idea/recipe a couple years ago, but it wasn't until a few weeks ago that I made these little gems.   They're one of my new food fixations.  I brought them to the beach when I went with my side of the family, thinking I was about to rock their snacking world, and the dialogue went something like this:

Me:  I made crunchy roasted chickpeas for us to snack on.  You have to try them; they are so good!
Mom:  Oh, yeah.  They are good!  
Me:  You know about them?
Mom:  Yeah, we've made them a few times.  We like them.

Again, the last to know about/try something new(er).  I hope that you will not be the last to try these crunchy roasted chickpeas.  They make a great snack- they're affordable, healthy, and tasty, and very transportable.  The only problem is that you'll look down and wonder, "who ate all my chickpeas?!"

from Everyday Food magazine

2 cans or 3 cups prepared chickpeas
3 tablespoons olive oil
Coarse Salt
1 1/2 tsp. flavoring spice of your choice

Preheat oven to 400 degrees. Drain and rinse chickpeas and scatter on a paper-towel-lined rimmed baking sheet. Let stand 15 minutes. Remove towels and toss chickpeas with olive oil. Roast until crisp and golden, about 45 minutes, stirring occasionally. Toss with salt and ground seasonings if desired, and serve.

Notes
  • I used chickpeas that I prepared from dried ones.  I soaked them overnight and then cooked them on the stove top, bringing them to a boil and then cutting the heat back to simmer them until softened, around 1- 1.5 hours.  I used those in place of the canned chickpeas, and I used about 1/2 lb.
  • I have tossed the chickpeas with various combinations, but my favorite is chili powder and ranch dressing mix.  Paprika/smoked paprika and plain, salted are good too.


Dorie Greenspan's World Peace Cookies

0

Category: , ,


I'm not sure why we haven't tried baking cookies as foreign policy yet, but these are apparently the ones to bake if we ever do try.

I made these cookies when I wanted to make an easy, no-fuss dessert and when I didn't want to have to shop for a lot of special ingredients, and these were perfect.  I had heard and read great things about them from a friend and other food bloggers who are big fans of Dorie Greenspan.  I've had the Baking: From My Home To Yours cookbook for several years, and am slowly working my way through the recipes, and this is one you'll be able to come back to and make for numerous occasions.  The cookies are a chocolate sablé, so they're pretty intensely flavored and have a crumbly texture.  The chocolate chips make for a nice, smooth element in the midst of the rest of the cookie.  They're a nice change up from the "normal" cookies, and I loved them.  Oh, and the cookie dough before it was baked?  Fugeddabouit.  Delectable.

One weird thing I noticed that I can't explain is that the first time I made these, I made them in my mother-in-law's oven, which is a convection oven.  The cookies came out small; they didn't spread.  They were still good, but you didn't feel like you were getting much.  They were polite, "oh I'll just have a bite" cookies.  The second time I made them in my conventional, heating element on the bottom oven, they spread out and were probably 2-3" in diameter.  Moral?  If you have a convection oven and know how to use it, hopefully you'll be fine, but your cookies might stay small.  I did also bake the second batch from a frozen log of dough, though usually that inhibits rather than encourages spreading.

World Peace Cookies
from Dorie Greenspan

Makes about 36 cookies

1 1/4 cups all-purpose flour
1/3 cup unsweetened cocoa powder
1/2 teaspoon baking soda
1 stick plus 3 tablespoons unsalted butter, at room temperature
2/3 cup (packed) light brown sugar
1/4 cup sugar
1/2 teaspoon fleur de sel or 1/4 teaspoon fine sea salt
1 teaspoon vanilla extract
5 ounces bittersweet chocolate, chopped into chips, or a generous 3/4 cup store-bought mini chocolate chips

Sift the flour, cocoa and baking soda together.

Working with a stand mixer, preferably fitted with a paddle attachment, or with a hand mixer in a large bowl, beat the butter on medium speed until soft and creamy. Add both sugars, the salt and vanilla extract and beat for 2 minutes more.

Turn off the mixer. Pour in the flour mixture, drape a kitchen towel over the stand mixer to protect yourself and your kitchen from flying flour and pulse the mixer at low speed about 5 times, a second or two each time. Take a peek — if there is still a lot of flour on the surface of the dough, pulse a couple of times more; if not, remove the towel. Continuing at low speed, mix for about 30 seconds more, just until the flour disappears into the dough — for the best texture, work the dough as little as possible once the flour is added, and don’t be concerned if the dough looks a little crumbly. Toss in the chocolate pieces and mix only to incorporate.

Turn the dough out onto a work surface, gather it together and divide it in half. Working with one half at a time, shape the dough into logs that are 1 1/2 inches in diameter. Wrap the logs in plastic wrap and refrigerate them for at least 3 hours. (The dough can be refrigerated for up to 3 days or frozen for up to 2 months. If you’ve frozen the dough, you needn’t defrost it before baking — just slice the logs into cookies and bake the cookies 1 minute longer.)

Getting ready to bake: Center a rack in the oven and preheat the oven to 325°F (160°C). Line two baking sheets with parchment or silicone mats.

Working with a sharp thin knife, slice the logs into rounds that are 1/2 inch thick. (The rounds are likely to crack as you’re cutting them — don’t be concerned, just squeeze the bits back onto each cookie.) Arrange the rounds on the baking sheets, leaving about one inch between them.

Bake the cookies one sheet at a time for 12 minutes — they won’t look done, nor will they be firm, but that’s just the way they should be. Transfer the baking sheet to a cooling rack and let the cookies rest until they are only just warm, at which point you can serve them or let them reach room temperature.

Serving: The cookies can be eaten when they are warm or at room temperature — I prefer them at room temperature, when the textural difference between the crumbly cookie and the chocolate bits is greatest — and are best suited to cold milk or hot coffee.

Do ahead: Packed airtight, cookies will keep at room temperature for up to 3 days; they can be frozen for up to 2 months. They can also be frozen in log form for months, and can be sliced and baked directly from the freezer, adding a couple minutes to the baking time.

Notes

  • A bread knife works well for the slicing of the cookies since it is serrated and usually thin.

Cream Scones With Cherries

2

Category: , , ,


I can't remember if I've told you this or not, but I can still remember the first time I had a scone.  It was my freshman year of college, and one morning in our cafeteria there were these triangular, tough biscuits with blueberries.  They were topped with coarse sugar.  I decided to try one and absolutely loved it.  Slightly sweet, dense, and not dry, flecked with blueberries- they were a whole new baking experience.  I had no idea what they were, and I had no idea other people outside the Gardner-Webb cafeteria knew what they were.  Later, on another morning, a friend of mine remarked something about these little triangular biscuits and called them scones.  Oh, so these are somewhat familiar to others.  Hmm.  And so began my love of these little gems.  Those still hold the place of best scone ever in my mind, and I am slowly working to dethrone them.


While they're wonderful for breakfast, my favorite application for scones  is mid-morning or afternoon snack, with coffee or hot tea.  This particular recipe comes from Dorie Greenspan's Baking: From My Home to Yours and is one of many wonderful recipes I've made from this book.  It's also a good base recipe for jumping off into your own flavor worlds- add citrus fruit zest, other dried fruits, chocolate chips, or nuts for variety.  I would bet you could do savory applications, too.

This recipe is easy, and using a cold cheese grater and very cold butter make the work very quick.  

Cream Scones with Cherries
from Dorie Greenspan

1 egg
2/3 cup heavy cream
2 cups all-purpose flour
2 tablespoons sugar
1 tablespoon baking powder
1/4 teaspoon salt
5 tablespoons cold butter, cut into small cubes
3/4 cup dried cherries

Preheat oven to 400 degrees.

Beat egg and cream together and set aside (a two cup measuring cup works really well here). 
In large mixing bowl, whisk the flour, sugar, baking powder and salt together. Add the butter and rub it into the flour until you have a pebbly mixture.

Pour the egg and cream into the flour/butter mixture and stir to combine with a rubber spatula. Add in your dried fruit or other flavoring ingredients.  When the mixture is totally incorporated, divide the dough into two equal sized balls. Pat them disks about an inch tall. Place them on a parchment or silicone mat-lined baking sheet. Carefully cut each disk into six segments (I used a bench scraper) and separate them.

Bake the scones for 20-22 minutes, until the are nicely browned. Serve immediately. Store any leftovers in an airtight container.

Notes
  • The original recipe calls for dried currants, which I've never before seen in my grocery store.  What I know I love and can find are dried cherries.  
  • Depending on the effect you want, you can brush the top with more cream or an egg wash for a sort of glaze.  You can also sprinkle on coarse sugar.  I left them au naturale.

Dill Pickle Dip

0

Category: , , ,


I know we all have a little bit of a thing for chips and dip, am I right?  Long ago there were plain chips and french onion dip, and then we added in tortillas and salsa.  Now it's a multicultural free-for-all, with pita and tzatziki, hummus, and all sorts of other variations from around the world.  Isn't it great how much variety we have?

So this one is a new spin on the old, classic potato chip and dip concept, and it seems weird at first, but if you like pickles, the more you think about it, the better of an idea it seems.  As my friend Charlotte said, the flavor of this dip is like when you order a sandwich that is served with chips in a deli, and beside the chips is a dill pickle spear, and some of the pickle juice mingles with the chips beside it.  Those are your favorite chips, too, right?

This dip is easy, and makes a small batch, but with dips like this, a little goes a long way.  I found the original on Pinterest and made it for a Super Bowl party, and it was determined to be a success.  I did have to adjust the original recipe, so I'm posting as I made it.

Dill Pickle Dip
adapted from Buns In My Oven blog

1- 8 oz bar cream cheese, softened
1 Tb Worcestershire Sauce
1/2- 1 cup dill pickles, chopped
1 Tb (or more) pickle liquid
1 tsp dried dill

In a medium bowl, beat the cream cheese until smooth with an electric mixer.  Add in Worcestershire and pickle liquid and beat until well incorporated.  Stir in the pickles and dried dill with a rubber spatula or the beater.  At this point, taste and adjust seasonings as necessary.  Chill in refrigerator, preferably overnight.  Garnish with fresh or dried dill and serve with plain or plain ruffled chips.

Notes

  • The original recipe didn't have enough flavor to me, so I increased the dried dill.  It really helped the flavor.
  • This also benefits from a rest in the fridge to allow the flavors to mingle.  

PW Cinnamon Rolls

0

Category: , , ,


I sort of get on these quests for the holy grail of whatever recipe.  Please tell me I'm not the only one.  The cinnamon roll holy grail recipe quest is not yet ended, but this one is definitely a top contender.  First I tried out Peter Reinhart's Cinnamon Rolls, and they were very good.  They were a more substantial bread than these were, which is why my quest continued.  The cinnamon roll recipe has to be one of the absolute most popular Pioneer Woman recipes, and PW and others have created a lot of great variations.  This recipe makes a flip ton, and Pioneer Woman was right, if you give these as gifts, the recipients will want you to make them again.  This could be my fault, but they spread out/rose more than I'd expect the Holy Grail Recipe to do, which is why my quest continues.  Still, if I stopped here, I'd likely not be disappointed.


The dough- all rolled into a long rectangle.


The mess after.

This recipe is simple, and I halved the recipe because of its magnitude.  I still got something like 4-5 pans of cinnamon rolls.  Sometimes playing with baking ratios, even halving things, can mess with it, so as I said, I could be to blame for the bread to filling ratio not being exactly what I want.  Either way, do try this.  Regardless of my ratio comment, these are wonderful.  Especially the topping.  The topping is oh-so-good and to die for.  One good thing is that you can break the whole project up into stages, making for less to do on the day you want to serve them.  Serve these with a nice cup of coffee.  Or another cinnamon roll.


I am posting the halved recipe, as I made it.  Visit PW's website- the recipe title is the link- for her full recipe, beautiful step-by-step photos, and variations.

PW Cinnamon Rolls (original recipe)
from Pioneer Woman

2 cups Whole Milk
1/2 cup Vegetable Oil
1/2 cup Sugar
1 packages Active Dry Yeast, 0.25 Ounce Packets (about 2 tsp yeast)
4 cups (Plus 1/2 Cup Extra, Reserved) All-purpose Flour
1/2 teaspoon (heaping) Baking Powder
1/2 teaspoon (scant) Baking Soda
1/2 Tablespoon (heaping) Salt
 Plenty Of Melted Butter
1 cup Sugar
 Generous Sprinkling Of Cinnamon
 _____
 MAPLE FROSTING:
1 box (4 cups) Powdered Sugar
1 teaspoons Maple Flavoring
1/4 cup Milk
2 Tb Melted Butter
2 Tb Brewed Coffee
Dash teaspoon Salt

For the dough, heat the milk, vegetable oil, and sugar in a medium saucepan over medium heat to just below a boil. Set aside and cool to warm. Sprinkle the yeast on top and let it sit on the milk for 1 minute.
Add 8 cups of the flour. Stir until just combined, then cover with a clean kitchen towel, and set aside in a relatively warm place for 1 hour. After 1 hour, remove the towel and add the baking powder, baking soda, salt, and the remaining 1 cup flour. Stir thoroughly to combine. Use the dough right away, or place in a mixing bowl and refrigerate for up to 3 days, punching down the dough if it rises to the top of the bowl. (Note: dough is easier to work with if it’s been chilled for at least an hour or so beforehand.)
Preheat the oven to 375°F.
To assemble the rolls, remove half the dough from the pan/bowl. On a floured baking surface, roll the dough into a large rectangle, about 30 x 10 inches. The dough should be rolled very thin.
To make the filling, pour 3/4 cup to 1 cup of the melted butter over the surface of the dough. Use your fingers to spread the butter evenly. Generously sprinkle half of the ground cinnamon and 1 cup of the sugar over the butter. Don’t be afraid to drizzle on more butter or more sugar! Gooey is the goal.
Now, beginning at the end farthest from you, roll the rectangle tightly towards you. Use both hands and work slowly, being careful to keep the roll tight. Don’t worry if the filling oozes as you work; that just means the rolls are going to be divine. When you reach the end, pinch the seam together and flip the roll so that the seam is face down. When you’re finished, you’ll wind up with one long buttery, cinnamony, sugary, gooey log.
Slip a cutting board underneath the roll and with a sharp knife, make 1/2-inch slices. One “log “will produce 20 to 25 rolls. Pour a couple of teaspoons of melted butter into disposable foil cake pans and swirl to coat. Place the sliced rolls in the pans, being careful not to overcrowd. (Each pan will hold 7 to 9 rolls.)
Repeat the rolling/sugar/butter process with the other half of the dough and more pans. Preheat the oven to 375°F. Cover all the pans with a kitchen towel and set aside to rise on the countertop for at least 20 minutes before baking. Remove the towel and bake for 15 to 18 minutes, until golden brown. Don’t allow the rolls to become overly brown.
While the rolls are baking, make the maple icing: In a large bowl, whisk together the powdered sugar, milk, butter, coffee, and salt. Splash in the maple flavoring. Whisk until very smooth. Taste and add in more maple, sugar, butter, or other ingredients as needed until the icing reaches the desired consistency. The icing should be somewhat thick but still very pourable.
Remove pans from the oven. Immediately drizzle icing over the top. Be sure to get it all around the edges and over the top. As they sit, the rolls will absorb some of the icing’s moisture and flavor.